The best drone photography tips come down to five core areas: gear, camera settings, composition, lighting, and editing. Master these, and you’ll produce publishable aerial shots whether you’ve been flying for a week or a year.
Here’s exactly what to focus on:
- Prioritize a 3-axis gimbal, RAW support, and obstacle avoidance when choosing a drone; stability beats price every time.
- Always shoot in manual mode: ISO 100–400, variable aperture where available, manual white balance, and RAW format.
- Practice flying in open, low-stakes locations before heading anywhere worth photographing.
- Composition drives great aerial shots; rule of thirds, leading lines, symmetry, and scale contrast all apply from the air.
- Golden-hour and blue-hour light will do more for your aerial landscape photos than any camera upgrade.
- Any paid drone photography work in the US legally requires an FAA Part 107 certificate, no exceptions.
- ND filters are essential for smooth, cinematic video in bright conditions.
- One slow, clean camera movement always beats busy, multi-directional flight paths.
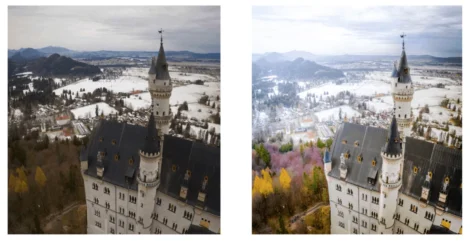
- Post-processing in Lightroom is where good aerial photos become great ones; shoot RAW to unlock full editing latitude.
Choose the Right Gear First
The best drones for photography share four non-negotiable specs: RAW file support, obstacle-avoidance sensors, reliable GPS hold, and a stabilized gimbal — standard on most current models, but worth confirming on budget options. These features let you focus on creative decisions instead of fighting the aircraft.
For beginners, the best drone for beginners doesn’t need to be expensive; it needs to be stable and forgiving. Once you’re ready to pursue paid work, move up to a prosumer model with at least a 1-inch sensor. Larger sensors capture more light, more detail, and a wider dynamic range than any other change you can make to your setup.
For a full breakdown of which models perform best for aerial imaging, see our real estate photography equipment guide.
Set Your Drone Camera Settings Manually Every Flight
Auto modes will consistently underdeliver. Dialing in your drone camera settings before takeoff is the single most controllable variable you have. Here’s the standard setup:
- Format: RAW or RAW+JPG
- ISO: 100–400 for most conditions; modern 1-inch sensors handle up to ISO 800 cleanly in good light
- Aperture: f/2.8–f/5.6 if your drone has a variable aperture; most consumer models have a fixed aperture, so skip this setting
- Shutter speed: 2× your frame rate for video (the 180-degree rule)
- White balance: Manual — lock it once per lighting condition
Shooting RAW gives you the latitude to recover blown highlights, lift dark shadows, and adjust color in post. It’s non-negotiable for professional results.
Pro tip on DJI gear: For DJI drone photography tips specifically, open the DJI Fly app, navigate to camera settings, and enable RAW+JPG capture. You’ll get a share-ready file and a full-quality RAW original for every frame — a useful safety net on paid shoots.
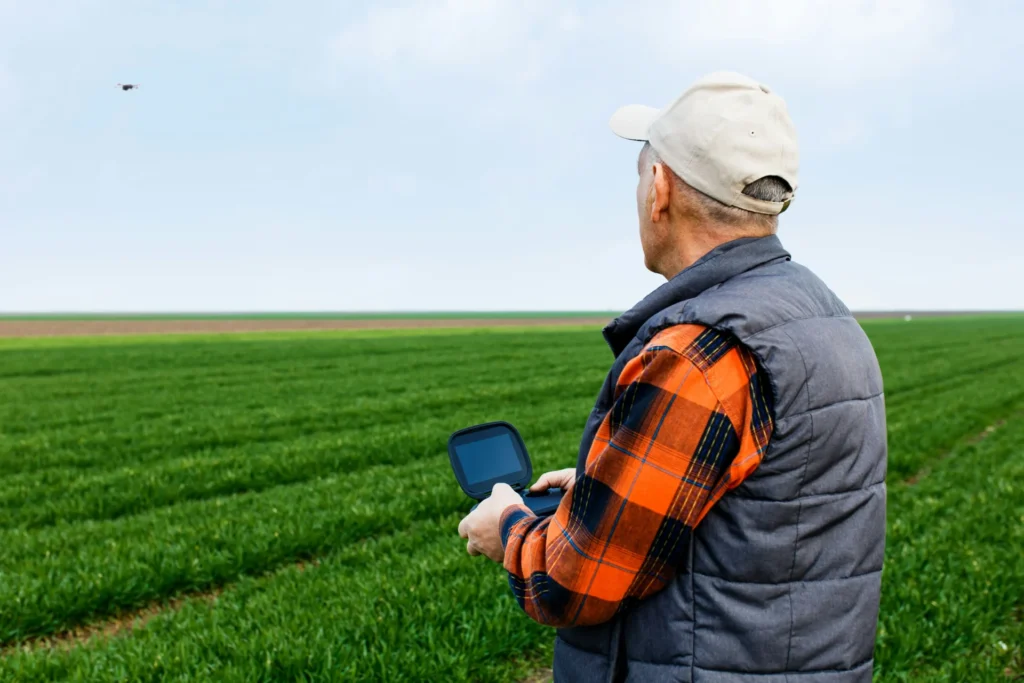
Practice Flying Before You Shoot Anything Worth Photographing
Smooth flights produce sharp images. Jerky inputs, rushed movements, and nervous overcorrections show up directly in your footage. Log your early hours in empty parks or open fields where there’s nothing to hit and nothing to distract you.
Build muscle memory for slow pans, steady altitude holds, and clean orbit moves. Developing your aerial photography skills in a low-stakes environment helps avoid costly mistakes when it counts. This step is where most beginners skip ahead and pay for it later.
Apply Strong Drone Photography Composition From the Air
Altitude doesn’t make a compelling image — drone photography composition does. The same principles that apply on the ground apply from above:
- Rule of thirds: Place your horizon or primary subject along grid lines, not dead center
- Leading lines: Roads, rivers, and shorelines naturally draw the eye through the frame
- Natural symmetry: Aerial views reveal symmetrical patterns that are invisible from the ground
- Scale contrast: One small subject set against a vast landscape creates immediate visual weight
Top-down (nadir) shots reveal patterns and geometry — think crop fields or tiled rooftops. Oblique angles add depth and a sense of place. Use both deliberately.
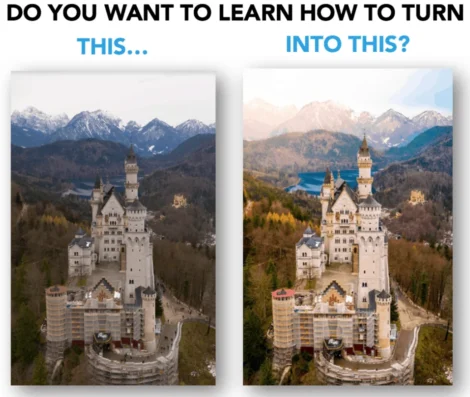
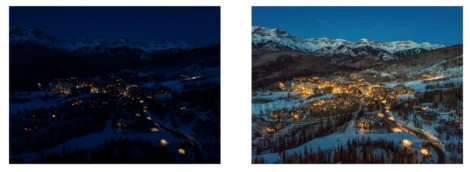
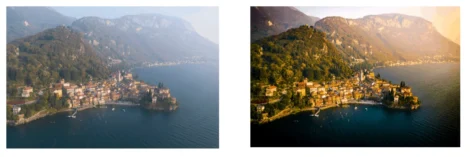
Shoot During Golden Hour for Aerial Landscape Photography
Midday sun is the enemy of great aerial landscape photography. Light from directly overhead flattens shadows, washes out color, and creates blown highlights that are difficult to recover, even from RAW.
Golden hour — the first and last hour of sunlight — does the opposite. Low-angle light produces long shadows, warm tones, and visible texture across every surface. Blue hour, just before sunrise and just after sunset, delivers a cooler, moodier quality that works especially well for architectural and urban aerials.
Plan your flights around light, not convenience. The difference in output quality is not subtle.
Tips for Drone Photography in Real Estate
Drone photography for real estate is the most immediately accessible commercial application for aerial photographers. The shots that sell listings are exterior overviews, neighborhood context, proximity to water or parks, and twilight photography for luxury properties.
One requirement that is not optional: any paid commercial drone work in the US requires an FAA Part 107 Remote Pilot Certificate. You pass a written knowledge test at an FAA-approved testing center to earn it.
Our FAA Part 107 Exam Prep Course is designed to help you pass on your first attempt, with a money-back guarantee* if you don’t.
Use ND Filters for Cleaner Exposure
ND filters are sunglasses for your lens. They reduce incoming light so you can maintain the 180-degree shutter rule in bright conditions, and they produce natural motion blur in water and foliage, making footage look cinematic rather than choppy.
A standard kit covering ND4, ND8, ND16, and ND32 handles the majority of lighting situations you’ll encounter. Most introductory aerial photography tips skip this step entirely; don’t, it’s one of the fastest ways to close the gap between beginner and professional output.
Capture Smooth Footage With These Drone Videography Tips
The most common mistake in aerial video is doing too much at once. The best drone videography tips are about restraint, not complexity
| What | How |
| Speed | Fly slower than feels natural; fast movement looks amateur |
| Movement | One direction at a time; avoid simultaneous pan and tilt |
| Sensitivity | Lower expo settings to soften stick inputs |
| Resolution | 4K/24fps for cinematic; 1080p/120fps for slow motion (60fps if 120fps unsupported) |
Develop these skills further in our Aerial Video A to Z course.
Turn Drone Photography Tips into a Real Income
Aerial Photo Pro is Drone Launch Academy’s drone photography course taught by Alex Harris, an award-winning pilot and former Hollywood editor who has worked with HGTV, Nike, ESPN, Intel, and Discovery Health.
The course is designed for drone pilots who can fly but struggle to take and edit professional-quality photos. It covers:
- Camera settings and filters
- Composition and framing techniques
- Real estate photography angles and altitudes
- HDR, low-light, and panoramic shooting
- Full post-processing walkthrough in editing software
- How to attract and land paying clients
Great drone photos come from photography skills, not just flying ability. Start with the area that addresses your current weakest point. If high-paying commercial work is the goal, develop your skills with our courses first. Everything else builds from there.
*FAA Part 107 Test Prep Course Guarantee:
- Complete all modules in the course
- Received a Drone Launch Academy Certificate of Completion, obtained by achieving a passing score (85% or better) on one of the Final Exams.
- Scored an 85% or higher on one of our practice Final Exams within 7 days before taking your FAA unmanned aircraft knowledge exam.
- Submit your refund request within 90 days of taking your Unmanned Aircraft knowledge exam.
If you fail your Unmanned Aircraft knowledge exam, please complete the refund form at dronelaunchacademy.com/107refund to receive your course refund and your exam registration fee credit.
Disclaimer: Individual results may vary.
*Aerial Photo Pro Money-Back Guarantee: If you sign up for the course, go through the material, and don’t think you got your money’s worth, just let us know within the first 30 days, and we will refund your entire purchase.
Want your aerial shots to look more professional and help you land paid work?
Great drone photography is a mix of flight skill, camera settings, composition, editing, and client expectations. If you want to improve your aerial media skills, explore Drone Launch Academy’s media-focused courses and then use Drone to $1K to build the business side.
Download the Drone Business Launch Checklist
Before you spend more money on gear, map out the business basics: certification, niche, services, pricing, insurance, deliverables, outreach, and follow-up. This checklist helps you turn a drone idea into a focused business plan.
Want to turn drone skills into paying clients?
Getting certified is only the first step. If you want a clear roadmap for pricing, outreach, client acquisition, and building a profitable drone business, Drone to $1K walks you through the business-building process step by step.
Great drone photography is a mix of flight skill, camera settings, composition, editing, and client expectations. The more you practice with intention, the faster your aerial shots will improve. If you want to turn those skills into paid work, the next step is building the business side — and Drone to $1K is designed to help you do exactly that.